

")
I was really excited to finally get another game in. Unfortunately, the rust showed in a few places here as there are a few things I would have done differently, which I’ll discuss later.
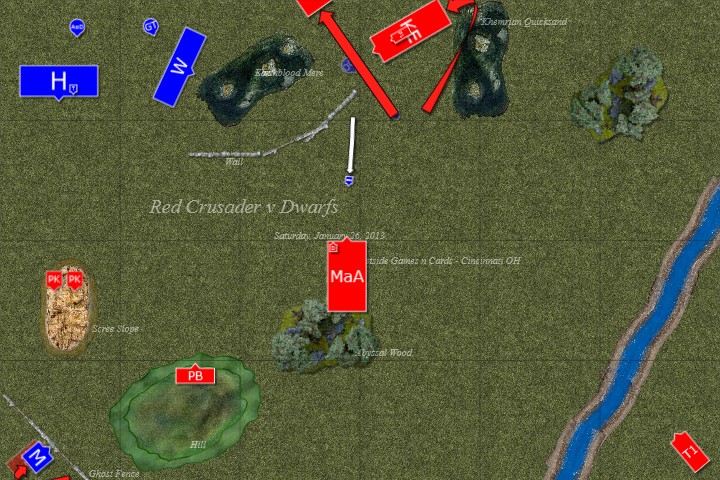
Like all of my battle reports, the spacing isn’t quite right as the terrain sizes in Battle Chronicler are different than what we used on the table. In this instance, the swamps were smaller and things are a little distorted as I’m trying to compensate a bit.
This was a 2500 point battle line scenario with randomly generated terrain.
I placed the river, the quicksand, the ghost fence in the bottom left corner, the hill, and the swamp behind the wall. I put them where they are for a few reasons. My opponent placed the central wall first, so I plopped the swamp behind it to make it harder for him to garrison. I put the quicksand over to the right of the wall to further break up his deployment zone. He placed the forest in the right corner, which I was pretty happy with as it got it out of the way of my knights. I made the rest of my terrain drops to just get the stuff out of the way.
As for Deployment:
1. I dropped the Trebs first and put them in opposite corners, because of his miners.
2. I then dropped my bowmen, and then mounted yeoman next to get an idea of where he was placing his stuff.
3. I dropped the Peg Knights to Threaten the Left Flank.
4. At that point, I could see where his combat blocks were going so I dropped my Men at Arms and Knights so that I could get the easy points and roll up his flank.
5. I made a vanguard move with my Peg Knights so that I could charge over the Hammerers into the Anvil.
6. I moved the Mounted Yeoman up to possibly draw some fire.
My level 4 rolled the Amber Spear, Savage Beast of Horros, Pann’s Impenetrable Pelt, & Curse of Anraheir.
My Damsel rolled Transformation and dropped flock of doom for Wyssan’s Wildform.

Dwarf 1
Doing as Dwarfs do, he only moved the Gyrocopter up!
Shooting:
1. His Organ Gun hit my Mounted Yeoman 10 times and inflicted 9 wounds!
2. The Cannon got 2 Kotr.
3. The Anvil put Wrath and Ruin on my KotR and killed 1 of them.

Bret 1
Movement:
1. So this was the first instance of sloppy play that popped up! His Hammerers were packing the rune of challenge and he usedit on my Peg Knights. The rune of challenge forces that unit to either charge or flee. I should have fled, but being a chivalrous knight, I charged!
2. Again, the diagram is off a bit. I tried to charge the Gyrocopter with my peasants, they needed an 11 to make it, but failed (as i expected them too) and moved up 6″.
3. KE marched 16″.
4. My KotR marched 8″, because of Wrath and Ruin.
Magic went 5 v 7
1. I tried to cast a big Amber Spear on his Organ Gun, but was dispelled.
Shooting:
1. My Treb attempted to hit the Organ Gun, but scattered and got 4 Quarrlers. They passed the panic test though.
2. My other Treb managed to kill 3 warriors.
Combat:
Pegs v Hammerers
1. His BSB issued a challenge, I answered with my Champion. I did no wounds and took 1 for my trouble.
2. My other peg knights killed 3 Hammerers and took 3 wounds in return. I lost combat and fled 11″. They ended up close to where they yellow arrow is.

Dwarf 2
Movement:
The Miners popped on next to my leftmost Treb.
1. His Dragon Slayer behind the wall attempted a long charge against my KE. He stumbled forward a couple of inches to end up on the other side of the wall. He needed an 11 on the table to make it.
2. His other Dragon Slayer moved up to get ready to redirect.
3. He moved the Gyrocopter to the side of my KE so that he could template them.
4. His warriors angled toward the flank to get ready in case I got around to the rear.
Shooting:
1. His Organ Gun hit my KE 10 times and killed 2 of them.
2. His Quarrelers shot my KE, did nothing.
3. The Gyrocopter managed to kill 1 KE.
4. The Grudge thrower got 6 Peasants.
5. The Cannon killed 2 KotR
6. His Anvil failed to cast Oath and Honor on his copter and took himself out of action for the next two turns. I figured he would do this to charge and hold them up. I really wasn’t worried as I would have just used Savage beast of Horros on my Prophetess next turn and made way to take care of it.

Bret 2
Movement: The diagram will have some issues here and alot happened. I’ve shifted stuff around to represent what happened. I’m also not sure we did everything totally right.
1. My KE declared a charge against the Quarrelers. They made a Stand and Shoot and did no wounds.
2. My Peasants declared a charge against the Gyrocopter, he said he would stand for that one.
3. My KotR declared a charge against the Gyrocopter, he fled from that one. This diagram is a mess. The copter ended up just to the front and left of the Slayer.
4. Since he fled, I passed some redirect tests. My Peasants went to the Dragon Slayer on the left. My Kotr went to the Dragon Slayer on the right.
5. I then resolved the charges in this order.
6. My KE went into the Quarrelers. They were angled to clip the Cannon if they overran.
7. My Peasants failed their charge to the Dragon Slayer and moved up 6″.
8. My KotR made the roll and I wheeled them so that they would clip the Gyrocopter and still hit the Dragonslayer. This destroyed the copter and got my knights lined up to overrun into the Organ Gun.
9. My Peg Knights did not rally and fled another 5″.
Magic went 3 v 7
1. I tried to cast Pann’s on my General, it was dispelled.
Shooting:
1. My treb killed 9 warriors.
2. The other peasant rabble did nothing.
Combat:
1. My KE killed 7 Quarrlers and took no wounds. He broke, I ran him down and hit the cannon.
2. His Dragonslayer challenged my General and ate a Heroic Killing Blow for his trouble. I overran and hit the Organ Gun.

Dwarf 3
Movement:
1. His miners charged my Treb.
2. His slayer moved up to attack the peasants!
Shooting:
1. His Grudge Thrower scattered off.
Combat:
1. His Miners crushed my Treb and turned to face the Bowmen.
2. My KE crushed the Cannon and reformed.
3. My KotR crushed the Organ Gun and ran off the table.
Bret 3
Movement:
1. My KotR came back on the table and wheeled to face the flank of his warriors.
2. My KE made a convoluted move with a bunch of wheels around the wall to avoid the marsh. They were facing the front of the warriors. Weren’t in the marsh or on the wall.
3. I got my damsel out of the Peasant block to avoid the Dwarf Slayer.
4. I turned my Bowmen to face the Miners.
5. My Peg Knights rallied. I left them facing the Miners so I could charge them next turn.
Magic went 7 v 10
1. I threw 6 dice at turning my damsel into a dragon just for the hell of it. I rolled a 26. He then rolled a 27!
Shooting:
1. My Treb misfired.
2. My Bowmen got 1 miner.

Dwarf 4
Movement:
1. His miners tried to charge my Bowmen. I hit nothing with my stand and shoot. he moved up 5″.
2. I expected his slayer to charge the peasants. He did an ole though and moved around so that he could see my damsel!
3. He did not move his warriors. I expected him to make them face my KotR, but he was more worried about the KE as he was thinking I would just charge his stone thrower with my KotR next turn. There was room, diagram is slightly off.
Shooting:
1. He used the Anvil to cast Oath and Honor with Ancient Power. It went off, but only affected 1 unit. So he put it on the slayer and promptly declared another charge against my Damsel! I fled from the charge and went 8″. He moved up 6ish.
2. He dropped a rock dead on my peasants and killed 12 of them. They fled 10 inches!

Bret 4
Movement:
1. The rustiness got me again. I just couldn’t ignore the flank of those warriors so I charged it. I should have hit the Grudge Thrower instead and overran to the anvil. That would have netted me more points. I couldn’t close the door, so he aligned with me.
2. My Pegs charged his miners. It was pretty questionable as to whether it was flank or front. We rolled off and it hit front.
3. My KE continued there convoluted move. When it was all said and done they were in position for a front charge on the Hammerers.
4. My bowmen turned to shoot the slayer.
5. My peasants did not rally and continued to flee.
6. My damsel did not rally and ended up 1″ from the table edge!
Magic went 11 v 10
1. I used 4 dice to try and put curse on his Hammerers. He dispelled it with 4.
2. I then tried to go for the gusto and go for a big Savage Beast of Horros, but I failed the casting using 5 dice, which ended the magic phase.
Shooting:
1. My treb missed the slayer
2. My Bowmen tried to shoot the slayer and put 1 wound on him.
Combat:
1. My Peg Knights did 1 wound and took a wound, leaving only my chapion left! The Miners stuck.
2. My KotR did 8 wounds to his Warriors and took none in return. His unit champion challenged and I answered with my Unit Champion, but it was a pillow fight. I broke him, pursued, and hit the Hammerers in the flank.

Dwarf 5
Movement:
1. His Slayer charged my Men at Arms and caught them. They weren’t quite as close to the table edge and did not flee far enough to get away. The charge was also closer.
Shooting:
1. His Grudge Thrower got 2 of my KE.
2. The Anvil misfired as he went for ancient power with Wrath and Ruin. His misfire roll put it out of action for the next two turns.
Combat:
1. My KotR killed 8 Hammerers and one of my paladins took 1 wound.
2. His miners finished off my last Peg Knight.
We called the game at that point as my KotR and characters would just grind down the Hammerers. Being turn 5 neither unit was going anywhere. I could have also just charged them with my KE as well.
Victory to Bretonnia!

Post Game Thoughts!
1. I need to play more. I made a few mistakes in regard to how I played the magic phase and I really wish I would have charged that Grudge Thrower instead of those warriors. That anvil would have netted me around 400 points!
2. The Anvil is dangerous. The drama of trying to save my damsel from the slayer was entertaining as hell.
3. My big KotR deathstar is just about unstoppable once it gets into the flank or rear of the enemy line. I played a game against a newish Skaven Player (didn’t make a report as he was learning the game) a couple of weeks ago and was able to roll up his whole army once I got to the flank of it.
4. My bowmen and Yeoman don’t do much for me, but I seem to have just the right amount of trash drops to protect my knights during deployment.
5. The Rune of Challenge is pretty powerful. I’ll be on the lookout for it in the future.

Dwarf player should have played for time and had an extra OG and wrath and ruined the Peg Knights and keep his line intact . You pulled his line apart and took him down piecemeal .
You dictated the game very well and he was playing catch up . I would have castled up and refused flank against you and delayed yer Knights for as along as possible with the Anvil amd used the terrain to my advantage e.g. quicksand and deployed six inches from the table edge .